cPanel DNS Management: How to Configure Your Domain Settings with Ease
When you own a domain, one of the most important yet often overlooked aspects of managing your website is properly configuring your DNS (Domain Name System) settings. Whether you’re setting up a new site, switching hosting providers, or creating custom records for email and subdomains, cPanel DNS management gives you powerful tools to control your domain settings with ease. Understanding how DNS works and knowing how to navigate it within cPanel can help you avoid downtime, improve email delivery, and ensure your web traffic goes where it’s supposed to.
In this guide, we’ll walk you through the essentials of cPanel DNS management, explain the different types of DNS records, and show you how to configure them confidently. Plus, we’ll tell you how Tezhost.com can simplify your web hosting and DNS management experience.
What is DNS and Why Does it Matter?
The Domain Name System (DNS) acts like the internet’s phone book. When users type your website’s domain into their browser, DNS translates that human-readable domain name (like yourdomain.com) into a machine-readable IP address that points to the actual location of your website.
Without DNS, users would have to memorize complicated strings of numbers to access websites. By configuring DNS records properly in your cPanel, you ensure that emails are routed correctly, websites load properly, and services like subdomains and third-party tools function as expected.
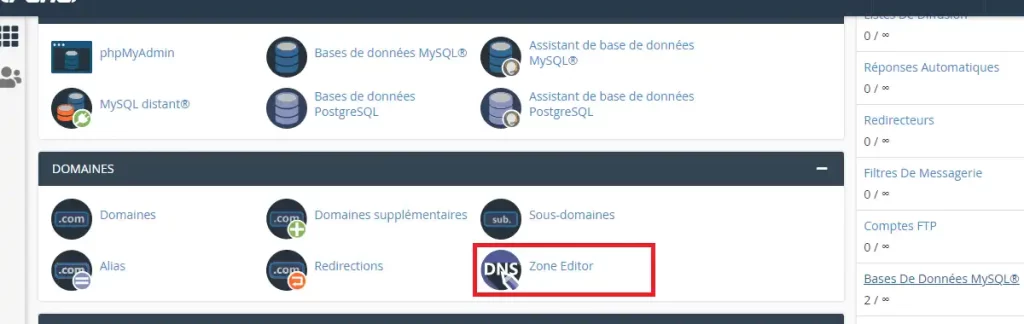
Accessing DNS Zone Editor in cPanel
To begin managing your domain’s DNS settings in cPanel:
Log in to your cPanel account (provided by your web hosting provider like Tezhost).
Scroll down to the Domains section.
Click on Zone Editor.
Here, you will see a list of your domains hosted on that account. Click Manage next to the domain you want to edit. This opens the DNS zone editor where you can view, edit, add, or remove records.
Common DNS Record Types and Their Functions
Before making changes, it’s helpful to understand the common DNS record types you’ll be working with:
A Record (Address Record)
The A record maps a domain to a specific IPv4 address. This is the record that tells browsers where to find your website.
Example:
rust
CopyEdit
yourdomain.com -> 192.0.2.1
CNAME Record (Canonical Name)
The CNAME record is used to alias one domain to another. This is useful for subdomains or pointing domains to services like Shopify, Blogger, or third-party email platforms.
Example:
rust
CopyEdit
blog.yourdomain.com -> yourblogplatform.com
MX Record (Mail Exchange)
The MX record defines where email for your domain should be delivered. If you use third-party email services like Google Workspace or Zoho, you’ll need to update your MX records accordingly.
TXT Record (Text Record)
TXT records are commonly used for domain verification, SPF (Sender Policy Framework), and other security features like DKIM and DMARC.
Example:
arduino
CopyEdit
“v=spf1 include:spf.protection.outlook.com -all”
NS Record (Name Server)
NS records specify which name servers are authoritative for a domain. These are typically set at your domain registrar but can be viewed in cPanel.
How to Add or Edit DNS Records in cPanel
Adding or editing DNS records in cPanel is straightforward:
In the Zone Editor, click Manage next to your domain.
Click the + Add Record button for a new entry or Edit next to an existing one.
Select the record type (A, CNAME, MX, etc.).
Enter the appropriate values (e.g., IP address, host name, TTL).
Click Save Record.
Be careful while editing DNS records. A wrong entry could disrupt your website, email, or other services.
Configuring Custom Subdomains
Let’s say you want to set up a subdomain like store.yourdomain.com that points to an eCommerce platform. In the Zone Editor:
Add a CNAME record for store pointing to your eCommerce service (e.g., store.shopify.com).
Save your changes.
Wait for DNS propagation, which can take up to 24 hours.
Setting Up Third-Party Email (e.g., Google Workspace or Zoho)
To use a third-party email service:
Delete the existing MX records.
Add the MX records provided by the email service.
Add the necessary TXT and SPF records for verification and anti-spam protection.
Save and wait for DNS propagation.
If using Tezhost.com, their support team can help configure your MX and TXT records for seamless email setup.
Tips for Effective DNS Management
Keep backups: Always take a screenshot or copy of your current DNS settings before making changes.
Use TTL wisely: Lower TTL (Time to Live) values speed up DNS changes, but long-term use can strain your server. Increase TTL after changes are stable.
Avoid duplication: Only one A or CNAME record should exist per subdomain unless you’re load balancing.
Check propagation: Use tools like WhatsMyDNS.net to check global DNS propagation.
Why Choose Tezhost for DNS and Hosting Solutions?
Managing DNS can be intimidating, especially if you’re new to web hosting. That’s why choosing the right hosting provider is critical. Tezhost.com is a trusted name in the industry, offering reliable and user-friendly hosting solutions tailored for businesses, bloggers, and developers alike.
With Tezhost, you get:
Free cPanel access with every hosting plan
24/7 support to help with DNS management, email setup, and security
Fast servers with 99.9% uptime
Budget-friendly packages without compromising on quality
Whether you’re hosting a personal blog, a business website, or an online store, Tezhost.com provides all the tools you need to manage your domain effortlessly — including expert guidance on cPanel DNS management.
Conclusion
Properly managing your domain’s DNS settings is essential to keeping your website running smoothly, your emails delivered successfully, and your services operating efficiently. Thanks to the intuitive interface of cPanel, even those with minimal technical experience can manage DNS records confidently. From setting A records and CNAMEs to updating MX records and enabling security features, cPanel DNS management puts powerful tools in your hands.
But remember, great tools are best paired with great support. That’s where Tezhost.com comes in. Whether you’re launching a new site, transferring a domain, or configuring complex DNS settings, Tezhost makes it easy with expert support and reliable hosting infrastructure.


No Comments yet!