PHP-FPM (PHP FastCGI Process Manager) is a powerful tool that can help you take your PHP applications to the next level. But like any other piece of software, it can be a little tricky to set up and get started with.
In this post, we’ll give you a comprehensive guide to PHP-FPM and everything you need to know to get it up and running on your server. We’ll start with a brief overview of what PHP-FPM is and how it works, then we’ll show you how to install it and configure it for your applications. After that, we’ll cover some of the more advanced features of PHP-FPM and how to use them to optimize your applications for peak performance.
So, if you’re looking to take your PHP applications to the next level, this is the post for you.
Let’s get started!
Defining PHP-FPM
PHP-FPM or PHP FastCGI process manager is a process manager for PHP, which can be used to improve the performance of PHP applications by taking advantage of the multi-processing capabilities of Unix-like systems.
It has grown to be the most widely used alternative to the older PHP FastCGI process manager with some additional features useful for sites of any size, especially busier sites. PHP-FPM is an alternative way to run PHP scripts on a server.
PHP-FPM is a process manager which maintains PHP processes and interfaces with the Apache web server to provide increased performance and stability.
It is now used by some of the largest sites, including Wikipedia, WordPress.com, and Facebook which have several million hits per second.
How Does PHP-FPM Work?
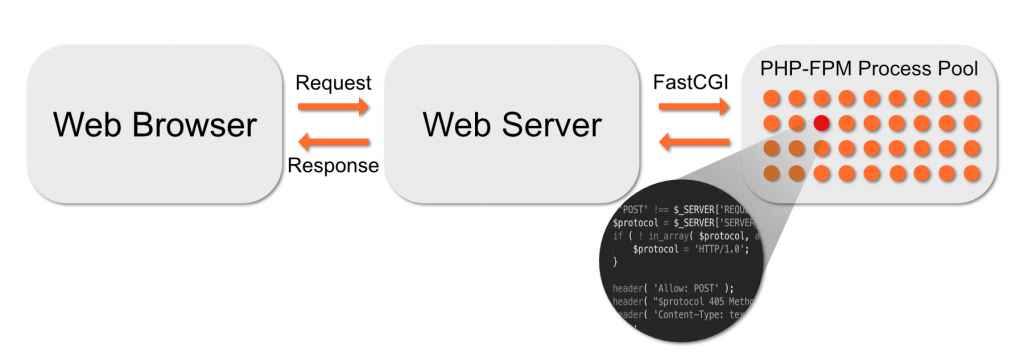
PHP-FPM is a FastCGI agent and is an alternative to the PHP FastCGI implementation that is included by default in most distributions. It offers better performance, a more flexible configuration, and higher scalability than the default PHP FastCGI configuration.
PHP-FPM is a flexible, open-source PHP FastCGI server for running on Linux and other operating systems. It can be used as an alternative to Apache or Nginx for serving static content.
The main difference between PHP-FPM and Apache is that PHP-FPM does not rely on the Unix socket mechanism to communicate with the web server, but instead uses an event-driven architecture based on the FastCGI protocol.
This means that PHP-FPM will not block while waiting for connections from clients, but instead will handle each request asynchronously and return a response as soon as possible.
The advantage of this approach is that it allows PHP-FPM to work with any type of connection: TCP/IP, TLS/SSL, Unix Domain Sockets (UDP), or Unix Domain Sockets (TCP).
It’s designed to handle the needs of dynamic websites and applications, so it can scale up to handle large traffic loads. The goal of PHP-FPM is to serve up application code directly to users without relying on a web server.
This means that when an application requests data from a web server, it will get it without any delay. The user experience will not be affected by these delays as they would have been if they were using Apache or another type of web server.
It also makes sure that all requests are handled properly by only handling static files, like images or CSS files, and not dynamic content such as scripts and HTML pages. This reduces the time spent on processing requests and helps improve performance for both users and developers alike.
Key Features
What makes FPM more efficient than traditional FastCGI implementations is its ability to manage multiple workers across multiple processes. This means that each process can be assigned its own allocated amount of memory, making it more scalable and efficient.
Additionally, FPM comes with several features that can be extremely helpful in high-traffic environments, such as:
- The ability to adapt the number of workers based on the current load
- Process monitoring and control
- Automatic process respawning
- Resource limits (memory, CPU, etc.)
- Faster uploading process
- Systematic management
All of these features combine to make PHP-FPM a very powerful tool that can be used to improve the performance of high-traffic websites.
How To Enable and Disable PHP-FPM
To enable or disable PHP-FPM using WHM cPanel, you need to follow these steps:
- Login to WHM– root user.

2.After logging in to WHM, look for “MultiPHP Manager”.It will be available under the “Software”

3. Under “Set PHP Version per Domain”, select the desired domain and click on the PHP-FPM menu by clicking the checkbox.

4. Or select the required domains and click “On” in the drop-down menu. After that click the “Apply”
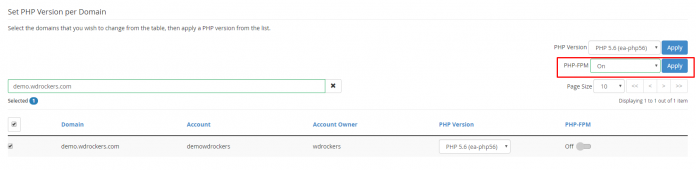
5.Now, your PHP-FPM on the selected domain is enabled. You’ll receive a confirmation notification after this process. To disable the PHP-FPM, simply select the domain. Then, click on the similar On option, and this time it will be off/disabled.

Best Practices for Using PHP-FPM
We’ve put together a few best practices for using PHP-FPM. These will help you get the most out of your web server.
- Use the latest stable version of PHP-FPM. This will ensure that you have the latest security updates and features.
- Use a separate pool for each user. This will help to keep your server resources balanced and improve performance.
- Use Unix sockets for communication. This is more efficient than using TCP/IP and can help to reduce latency.
- Increase the number of processes. This will help to improve performance, but be sure to monitor your server resources to avoid overloading your system.
Above mentioned following these best practices, you can be sure that you’re getting the most out of PHP-FPM and providing a high-performance web server for your users.
Conclusion
We hope our comprehensive guide to PHP-FPM was helpful. This powerful tool can make a big difference in the performance of your website. We hope you’ll consider using it on your site.
If you have any questions about PHP-FPM or web hosting in general, feel free to contact us at TezHost. We’re always happy to help our customers get the most out of their hosting plans.
For more such posts, visit our Blogs section.