WordPress is a popular content management system that provides a wide range of customization options. One of the key elements you can customize is the menu. In this post, we will guide you on how to create a custom WordPress menu to enhance the navigation of your website.
So, let’s dive in!
A well-organized and user-friendly menu is essential for any website. It allows visitors to navigate through different sections of your site with ease.
WordPress offers a powerful menu system that enables you to create custom menus and display them in various locations on your website.
WordPress Menus
WordPress menus are a collection of links that can be added to different areas of your website, such as the header, footer, or sidebar. They provide a structured navigation system.
This allows users to jump between pages or sections effortlessly. With WordPress, you can create multiple menus and assign them to specific locations.
Importance of Creating the Right WordPress Menu
The right WordPress menus play a crucial role in the overall usability and navigation of a website. Here are some important reasons why having the right WordPress menus is essential:
1. Enhanced User Experience:
Well-structured menus make it easier for visitors to navigate your website and find the information they need. A clear and intuitive menu structure improves the overall user experience, leading to increased engagement and satisfaction.
2. Improved Website Navigation:
WordPress menus provide a roadmap for users to explore different sections or pages of your website. By organizing your content into logical categories and subcategories, you can guide visitors to relevant information efficiently.
3. Easy Access to Important Pages:
With the right menus, you can highlight important pages or sections of your website. For example, you can create a prominent menu item for your “Services” or “Products” page, ensuring that visitors can quickly access and explore these key offerings.
4. Consistent Website Design:
WordPress menus allow you to maintain a consistent design across your website. By using the same menu structure and styling throughout your site, you create a cohesive and professional look, reinforcing your brand identity.
5. Support for Different User Devices:
Responsive WordPress menus adapt to different screen sizes and devices, ensuring a seamless experience for users accessing your website from desktops, tablets, or smartphones. This adaptability is crucial in today’s mobile-centric world.
6. SEO Benefits:
Well-organized menus contribute to better search engine optimization (SEO). By incorporating relevant keywords and optimizing the menu structure, you can improve the crawlability and indexing of your website, making it easier for search engines to understand and rank your content.
7. Promotion of Key Content:
WordPress menus can be used strategically to promote specific content or campaigns. You can create menu items that link to landing pages, special offers, or new blog posts, driving traffic and increasing visibility for your targeted content.
8. Flexible Menu Customization:
WordPress menus offer extensive customization options. You can choose different menu locations, create dropdowns or mega-menus, add icons or images, and apply custom styles to match your website’s aesthetics and branding.
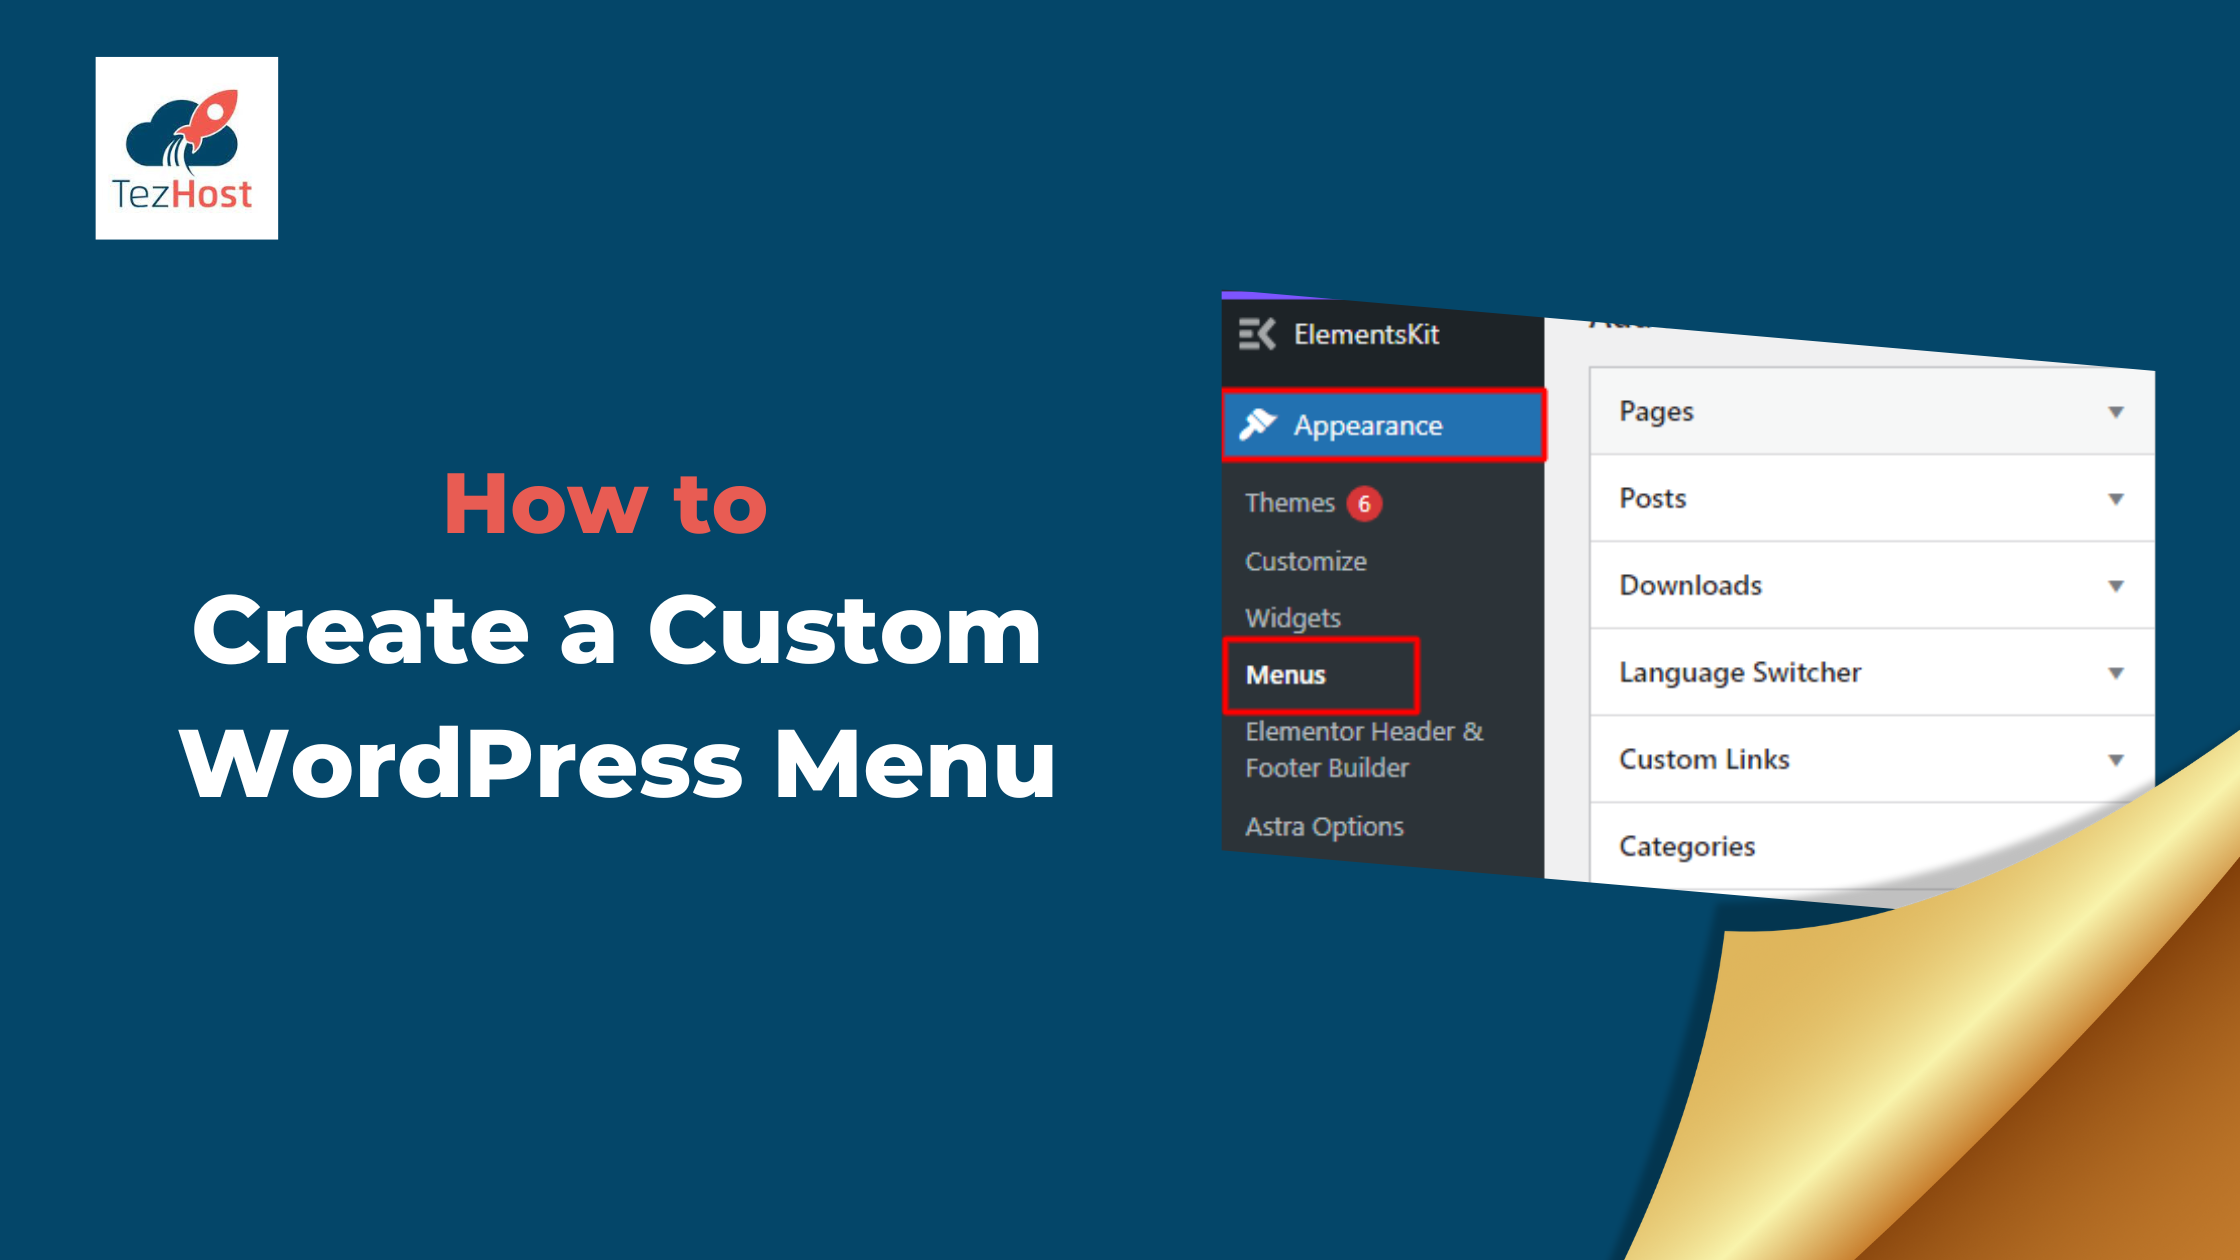
How to Create a Custom WordPress Menu?
To create a custom menu using this method, follow these steps:
1. Login to the WordPress dashboard.
2. Navigate to Appearance > Menus to alter the default menu of your website.
3. Give the name to the menus , and then click the Create Menu button.
Now, you can start adding your menu items. Add website’s categories, posts, and pages to your custom menus from the left column.
5. Select Pages > View All. Choose every page you want to be included in your menu by check boxes.
6. If you want to switch the order of the menu items, all you have to do is drag and drop them in the desired positions.
7. Now, to make sub-menus, all you need to do is to drag the category to right and release it. This way you will see the sub-item tag on the required sub menu. You can get this sub-menu back to the earlier position using the same step.
8. Remember to click Save Changes when you are completely satisfied with the properties.
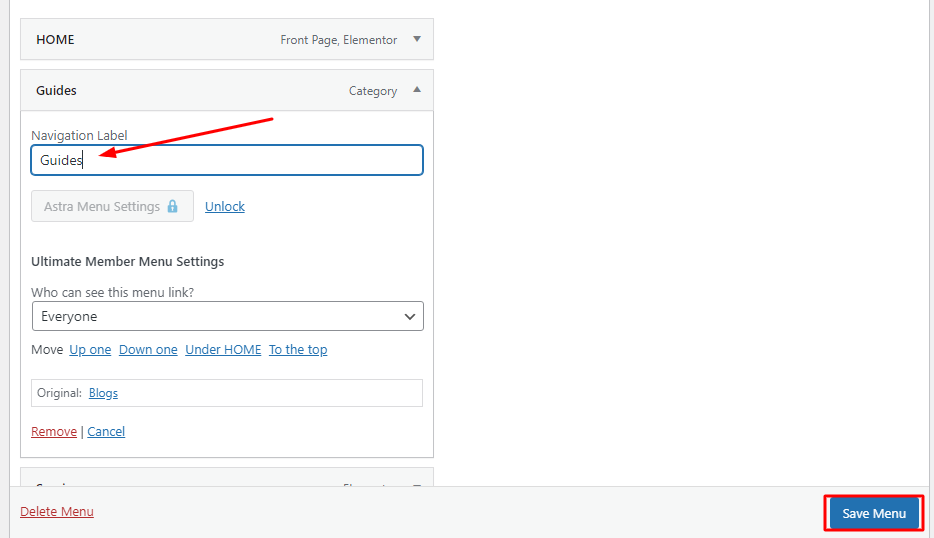
Removing and Renaming the Custom WordPress Menu
For some reason, if you wish to remove any item form the custom menu in WordPress, all you have to do is to:
1. Click on small arrow to the items showing on right side of the Page.
2. You’ll see a few details about that page and the Remove button down below. Click on it, and that item will be deleted.
3. To rename any item from the list simply change the name in Navigation label.
4. After all the changes make sure to click Save Menu to save all the changes.
Adding Custom Links to WordPress Menu
1. To add Custom links click Custom Links in the left column to be able to add whatever link you desire to your menu.
2. Each link must have a URL (its individual web address) and Link Text (the link’s name in the menu).
3. Now, click Add to Menu to finish.
Choosing the Custom Menu Location
You need to instruct WordPress where to use the menu you just made. The Manage Locations tab on the Menus page can be useful in this situation.
1. You will be taken to a page with a list of the various menu locations used in your Theme after selecting the Manage Locations tab on the Menus page.
2. Depending on the Theme that is currently being used, you may have a single menu location or numerous locations.
Note: The name of the menu may not always be used for your menu location, as illustrated below. It that will be largely dependent on your theme.
3. Choose an existing menu you’ve developed from the dropdown list, then assign it to the relevant Theme Location.
4. To save, click the Save Changes button.
Conclusion
Creating a custom WordPress menu is an effective way to improve website navigation and provide a better user experience. In this guide, we explored How to Create a Custom WordPress Menu. We have showed how to create new menus, how to rename or remove them. With this guide can also help you with the creating custom links for your Custom WordPress Menu.


No Comments yet!