Welcome to the exciting world of WordPress plugins! As you embark on your journey to enhance the functionality and features of your WordPress website, one of the fundamental skills you’ll need to master is the installation of plugins.
Whether you’re looking to add social media buttons, improve SEO, or trying to improve WordPress website speed, plugins are the magic ingredients that can transform your website into a powerful online presence.
If you’re new to WordPress or feeling a bit overwhelmed by the prospect of installing plugins, fear not! In this comprehensive guide, I’ll walk you through the various methods of installing plugins in WordPress, catering specifically to beginners.
So, let’s dive in and discover the different ways you can install plugins to take your WordPress site to the next level!
Different Ways to Install WordPress Plugin
- Search and Install through WordPress Dashboard
- Upload the Plugin file through Dashboard
- Upload through FTP or control Panel
1. Search and Install through WordPress Dashboard
Search and install WordPress plugin through dashboard is the easiest way to install and search plugin for WordPress websites. With this method you can search a plugin by typing you needs in the search bar as guided below like if you need a plugin for SEO you can search SEO to get a list of plugins for the SEO purposes.
Search and Install through WordPress Dashboard from the WordPress plugin directory is recommended method because when you use plugins from plugins directory the plugins are more trusted and less chances of getting nulled or cracked plugin which usually contain malicious code.
And that’s it! You’ve successfully searched for and installed a plugin through the WordPress Dashboard. You can now enjoy the added functionality and features that the plugin brings to your website.
Time needed: 5 minutes.
Here is the simple step-by-step guide to search for and install plugins through the WordPress Dashboard:
- Log in to your WordPress Dashboard:
Start by logging in to the admin area of your WordPress website. You can do this by entering your website’s URL followed by “/wp-admin” in your web browser and then entering your username and password.

- Navigate to the Plugins Page
Once logged in, navigate to the Plugins page by clicking on “Plugins” in the left-hand menu. This will take you to the Plugins dashboard where you can manage all the plugins on your website.
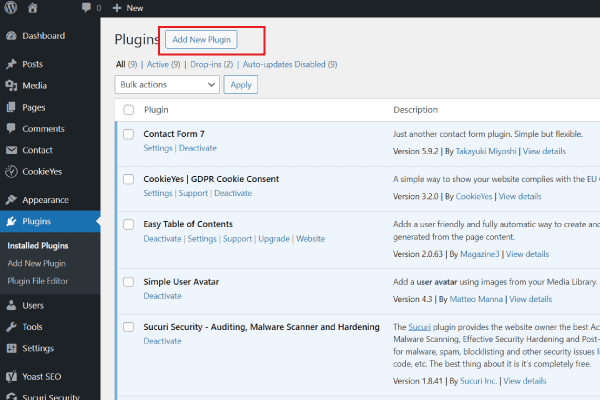
- Click on “Add New”:
On the Plugins page, you’ll see a button labeled “Add New” at the top. Click on this button to proceed to the Add Plugins page.
- Search for a Plugin:
In the search bar on the Add Plugins page, type in the name or functionality of the plugin you’re looking for. For example, if you want to add a contact form to your website, you can search for “Contact Form” in the search bar.
- Browse the Results:
WordPress will display a list of plugins that match your search criteria. You can scroll through the results to find the plugin that best suits your needs. Take a look at the plugin descriptions, ratings, and reviews to help you make your decision.
- Install the Plugin:
Once you’ve found the plugin you want to install, click on the “Install Now” button next to it. WordPress will automatically download and install the plugin onto your website.
- Activate the Plugin:
After the plugin has been successfully installed, you’ll see a message confirming the installation. To activate the plugin and start using it on your website, click on the “Activate” button.
- Configure the Plugin Settings:
Depending on the plugin you’ve installed, you may need to configure its settings to customize its functionality. This can usually be done by clicking on the plugin’s name in the Plugins dashboard and then navigating to the settings page.


2. Upload the Plugin through Dashboard
This method is suitable for those who want to install plugin by uploading it from their PC. Sometimes you need plugins which are not available on the WordPress plugins directory. To proceed with this step you need plugin in your local system. Be sure to download plugin from well known and trusted sources.
Here is the simple step-by-step guide to search for and install plugins through the WordPress Dashboard:
Log in to your WordPress Dashboard
Start by logging in to the admin area of your WordPress website. You can do this by entering your website’s URL followed by “/wp-admin” in your web browser and then entering your username and password.

Navigate to the Plugins Page:
Once logged in, navigate to the Plugins page by clicking on “Plugins” in the left-hand menu. This will take you to the Plugins dashboard where you can manage all the plugins on your website.

Click on “Add New”
On the Plugins page, you’ll see a button labeled “Add New” at the top. Click on this button to proceed to the Add Plugins page.
Click on “Upload Plugin”
On the Add Plugins page, you’ll see a button labeled “Upload Plugin” at the top. Click on this button to proceed to the plugin upload form.

Choose the Plugin File
Click on the “Choose File” button to select the plugin file (.zip format) from your computer. Once you’ve selected the file, click on the “Install Now” button.
WordPress will now upload and install the plugin file from your computer. This may take a few moments depending on the size of the plugin file and your internet connection.

Activate the Plugin
After the plugin has been successfully installed, you’ll see a message confirming the installation. To activate the plugin and start using it on your website, click on the “Activate Plugin” link.

Configure the Plugin Settings
Depending on the plugin you’ve installed, you may need to configure its settings to customize its functionality. This can usually be done by clicking on the plugin’s name in the Plugins dashboard and then navigating to the settings page.

And that’s it! You’ve successfully uploaded and installed a plugin through the WordPress Dashboard. You can now enjoy the added functionality and features that the plugin brings to your website.
3. Upload through FTP or control Panel
Upload plugin through FTP or control panel is a bit difficult as compare to above two methods. Here you need to access your hosting account and website directories. But this method is most suitable if you are unable to upload the plugin through dashboard.
Sometimes web hosting providers limit your uploading limit in WordPress which cause issues while uploading plugin through dashboard. If this is the case with you, follow below steps exactly to install plugin through cPanel which is most popular control panel for shared web hosting.
Log in to your cPanel Account:
Start by logging in to your web hosting control panel (cPanel) using the username and password provided by your hosting provider.
Access the File Manager
Once logged in, locate and click on the “File Manager” icon in the Files section of your cPanel dashboard. This will open the File Manager interface where you can manage the files and folders of your website.
Navigate to the WordPress Plugins Directory
In the File Manager, navigate to the directory where your WordPress website is installed. This is typically located in the “public_html” directory or a subdirectory within it. Once you’ve located your WordPress installation directory, navigate to the “wp-content” folder and then into the “plugins” folder.
Upload the Plugin Files
Once you’re inside the “plugins” folder, click on the “Upload” button in the File Manager toolbar. This will open a file upload dialog where you can select the plugin file (.zip format) from your computer. After selecting the file, click on the “Upload” button to upload the plugin file to your server.
Extract the Plugin Files
After the plugin file has been successfully uploaded, return to the File Manager interface. Locate the uploaded plugin file (usually displayed at the bottom of the file list) and select it. Then, click on the “Extract” button in the File Manager toolbar to extract the contents of the plugin file.
Activate the Plugin
Now that the plugin files are in place, return to your WordPress Dashboard. Navigate to the “Plugins” page, where you should see the newly uploaded plugin listed among the installed plugins. Click on the “Activate” link below the plugin name to activate it and start using its features on your website.
That’s it! You’ve successfully uploaded a plugin to your WordPress website using cPanel. You can now configure the plugin settings and start using its functionality to enhance your website.
If you are still unable to install plugin you might be using WordPress.com. For better understanding here is a guide about difference between WordPress.com vs WordPress.org.
Conclusion
Installing WordPress plugins is a straightforward process that empowers you to enhance the functionality and features of your website. Whether you choose to install plugins from the WordPress Plugin Repository, upload manually via FTP, or explore the plugin options available on different WordPress platforms, you have the ability to customize your website according to your unique needs.
Remember to select plugins carefully, ensuring they come from reputable sources and align with your website’s goals. Regularly updating your plugins and removing unnecessary ones will help maintain the security and performance of your website.
Furthermore, too many active plugins in WordPress website may cause loading issues. TezHost’s WordPress Hosting is fast and secure platform to host your site with higher uptime and better loading speed.